Working with Microservices-1: Running a Java app that consists of 10 Microservices on a Development server.

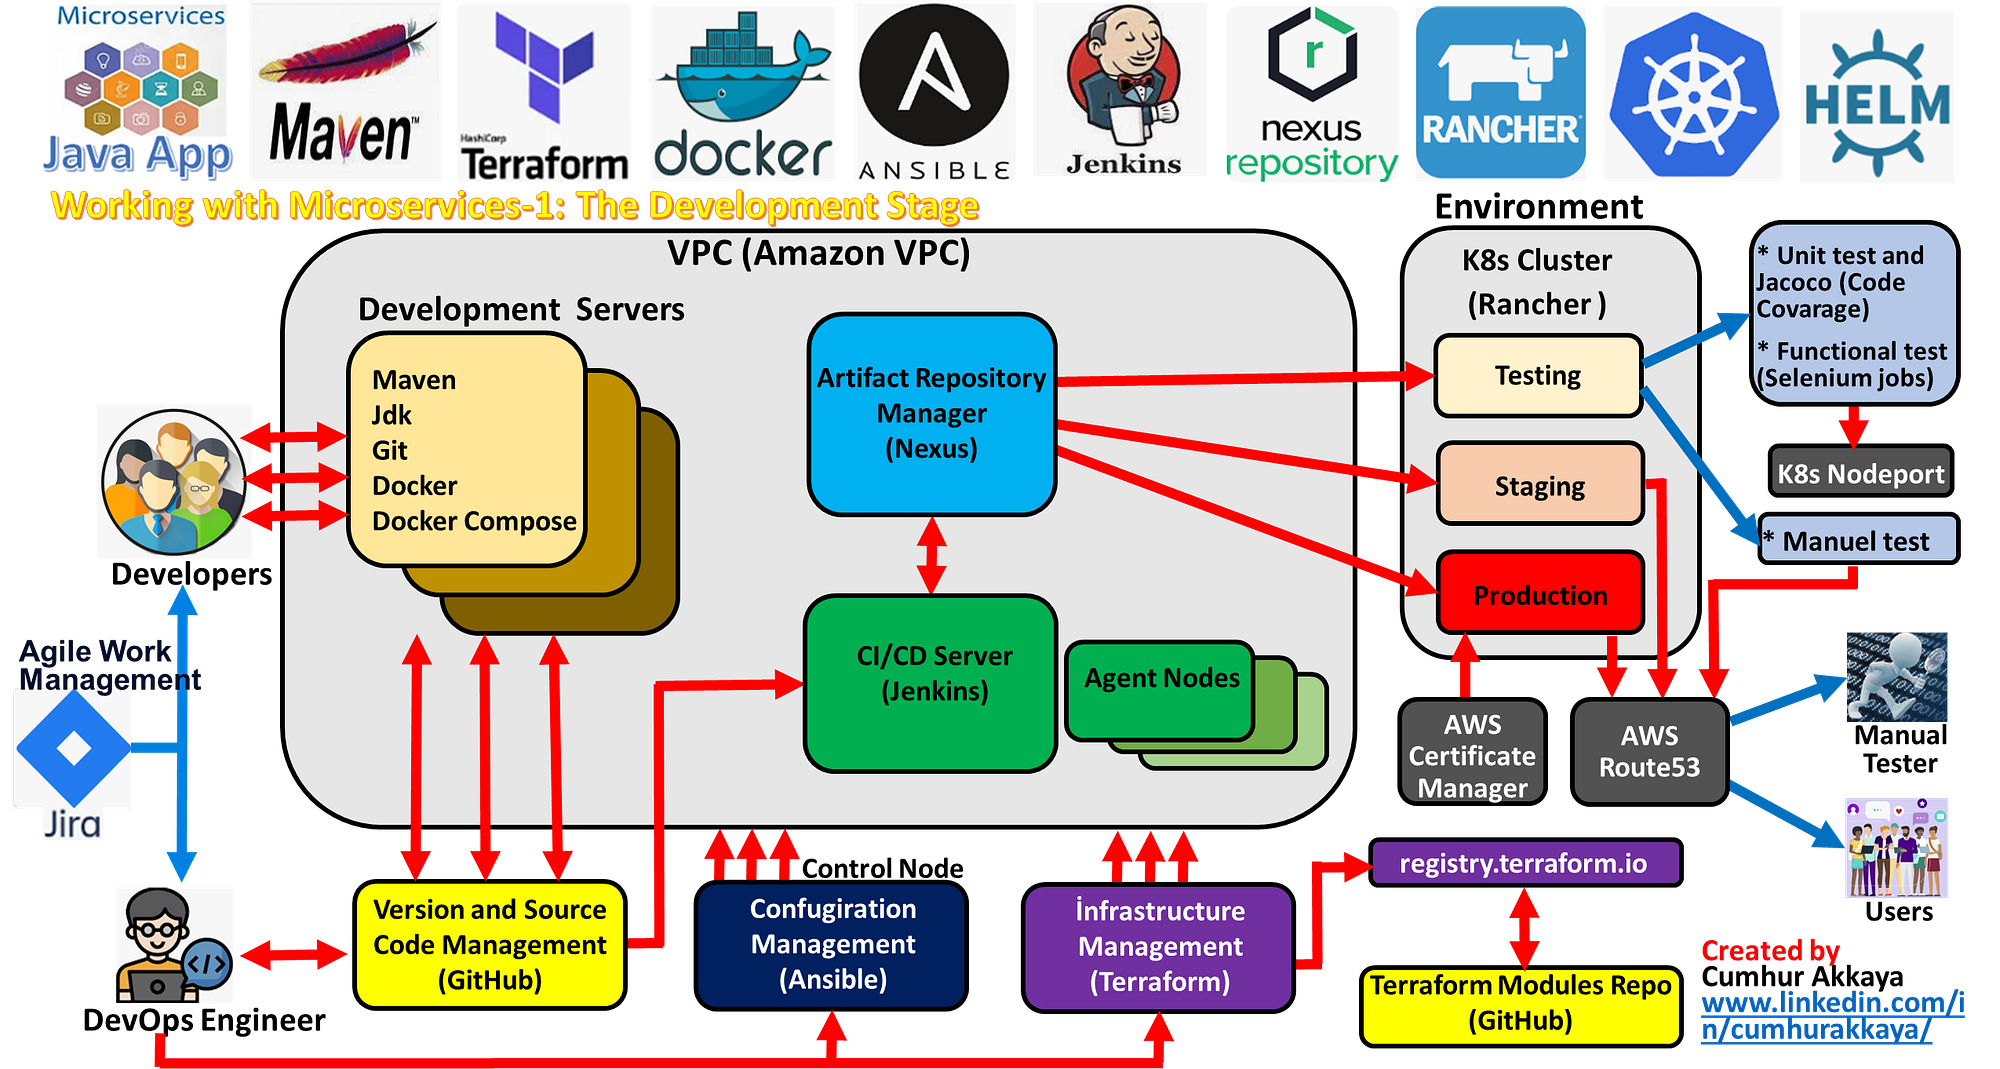
In this article series, we will work with a Spring pet clinic application consisting of 10 microservices. It is a Java-based web application developed by Spring company. We will run it on Development, Testing, Staging, and Production environments by using different DevOps tools (Jenkins, Kubernetes and Helm, Docker, Docker Compose, Terraform, Rancher, Nexus Repository, Maven, Ansible, Prometheus and Grafana, GitHub, Amazon Route 53, AWS Certificate Manager, AWS EKS, AWS RDS MySql Database, AWS S3 bucket, Selenium Jobs and Jacoco, Kompose conversion tool, Let’s Encrypt ACME and Cert Manager). We will create each environment and run our application in it. While we are working in Staging and Production environments, we will create full CI/CD Jenkins pipelines for each. We will do all these step by step, in this article series.

Cumhur Akkaya
19 min readJul 21, 2023

In summary, we will do the following for each environment;

In the Testing environment, there are two different QA tests; manual and automated tests (Functional Tests by using Selenium jobs). Firstly, we will make an infrastructure that will make these QA tests on the environment.

Then, in order to do the unit test, we will put the unit test (PetTest.java) that was prepared by the developers in the relevant places in the project file. We will add a Jacoco (Java Code Coverage) plug-in to pom.xml to generate a report (2). Then, we will start the test with “mvn test” command.

After the unit test is finished, we will run Functional Tests on the QA Environment using the Jenkins CI/CD pipeline every evening. For these, we will follow these steps;

  • We will package the app into jars with Maven, prepare “Dockerfiles” for each microservice and “helm charts” to deploy the application to the Kubernetes Cluster, build App Docker Images with image tags, push helm charts into the AWS S3 bucket, create AWS ECR Repo and push the images to the ECR Repo, create a Kubernetes cluster by using Terraform for QA tests, deploy our microservices App on the Kubernetes cluster using the Helm charts. Finally, we will run Functional Tests on QA Environment using Selenium jobs (automated test). When the test is finished, the cluster will be destroyed automatically by the Jenkins pipeline.

We will use the same testing environments for manual QA tests. The environment we have prepared for manual tests will remain open for a week. Manual testers will test the app from the Excel form that is given to them at this time.

I will start explaining the testing environment with the article below. We will do them practically step by step.

Working with Microservices-19: Explanation of the Testing Stage, and Running a Unit Test and Configuring Code Coverage Report using Jacoco tool.

In the Staging environment, before the production stage, we will make the final checks on the operation of our microservices app. Different from Testing, we will use the following in the Staging phase;

  • We will use Rancher to create and manage our Kubernetes clusters, create the Rancher server by using Terraform, and install the Rancher into it by using the Helm chart. We will create the cluster on AWS EC2 by using Rancher’s menus. With Rancher, we will easily make changes in the cluster via its dashboard; add nodes, delete nodes, and edit configuration files. We will use MySql Database on the pod for the customer records. Finally, we will check whether our microservices application works in the browser.

I will start explaining the staging environment with the article below. We will do them practically step by step.

In the Production environment, Our application will be made available to users on the Internet. In the production Stage, Whenever the developers push their codes to the GitHub repository, the Jenkins pipeline will run automatically thanks to the GitHub webhook and automatically update our Java-based application running on the web. Different from Staging, we will use the following in the Production phase;

  • We will create the cluster using AWS EKS and then, import it into Rancher by using Rancher’s menus. We will use AWS RDS MySql Database for customer records. We will set Domain Name, Create an “A record” for the microservices app in our hosted zone by using AWS Route 53 domain registrar and bind it to our “ app cluster”. Configure TLS(SSL) certificate for HTTPS connection to the domain name using AWS Certification Manager. Finally, we will check whether our microservices application works in the browser, and monitor the microservices apps in the cluster with Prometheus and Grafana.

I will start explaining the Production environment with the article below. We will do them practically step by step.

In the development server, we will compile, test (with junit in pom.xml), build, and run our code on the container via Docker, Docker Compose, and Maven in this article. We will install the development server by using Terraform. We will create and clone Source Code Management Repository(GitHub) to Development Server, and we will work in different branches (dev, feature, bugfix, hotfix, etc.) on GitHub for the DevOps cycle. Finally, after the “docker-compose” command runs, what happens? is shown in Video-1. We will observe what happens in the containers. We will do them all step by step.

Video 1- After the “docker-compose” command runs, what happens?

1. What is the Development server?

Figure 1

A development server is a server that is used by developers, where developers create the code and test it directly to an application. It provides basic hardware and software tools for running development tasks, such as programming, designing, and debugging (Figure 1).

2. Deploying a Development server on AWS

2. a. Prerequisites​

  • Amazon AWS Account: An Amazon AWS Account is required to create a Development server in the AWS cloud.
  • Amazon AWS Access Key: Use this link to follow a tutorial to create an Amazon AWS Access Key if you don’t have one yet.
  • Install Terraform: We will use it as an “Infrastructure as code” to provision the Development server in Amazon AWS.

2. b. Downloading the Development Terraform file

Clone the Development Terraform file to your folder in local compute from my GitHub repo, using the command below, as shown in Figure 2.

git clone https://github.com/cmakkaya/microservices-with-db-on-dev-server.git
Figure-2

This Terraform Template (check Figure-2) creates a Development server on EC2 Instances.

2. c. The Development Terraform file’s explanation and what to do in manual installation

Our Terraform Template will create the following, but if we want, we can also perform the manual installation by creating them ourselves in the respective AWS menus.

I. Terraform Template will create the necessary security group that allows ports; 22, 80, 8080, 9090, 8081, 8082, 8083, 8888, 9411, 7979, 3000, 9091, 8761 connections from anywhere, as shown in Figure 3. (To create manually it in AWS Console the link.).

Figure 3

II. It will create an Amazon Linux 2 Ec2 instance for the Development server, using the following script and values of the “dev.auto.tfvars” file;

It will prepare a development server on Amazon Linux 2 (t3a.medium) for developers, and it will create “Docker”, “Docker-Compose”, “Java 11”, and “Git” into the development server.

#! /bin/bash
sudo yum update -y
sudo hostnamectl set-hostname petclinic-dev-server
sudo amazon-linux-extras install docker -y
sudo systemctl start docker
sudo systemctl enable docker
sudo usermod -a -G docker ec2-user
sudo curl -L "https://github.com/docker/compose/releases/download/1.26.2/docker-compose-$(uname -s)-$(uname -m)" \
-o /usr/local/bin/docker-compose
sudo chmod +x /usr/local/bin/docker-compose
sudo yum install git -y
sudo yum install java-11-amazon-corretto -y
newgrp docker

In this step, in order to create a Development EC2 instance with the manual installation using the script;

Firstly, click on the “launch instance” in the EC2 menu in the AWS console. Launch an EC2 instance choosing “Amazon Linux 2” with “t3a.medium” type, ami = “ami-026b57f3c383c2eec”, region = “us-east-1”,

Then, choose the “dev-server-secgr” security group (We created the security group above.), “Name:Development Server of Microservices” tag, and your AWS “key.pem” key-pair.

And copy paste the script above into “user data”.

Finally, click on the “launch instance” button.

2. d. Modifying and applying the “dev.auto.tfvars” file

Go into the folder containing the Terraform files.

Note-1: We must modify appropriate variables in the “dev.auto.tfvars” file when launching the instance;

Line 1 “mykey”. You can use your existing key.pem in AWS, as shown in Figure 4.

Figure 4

If you want you can create a new key.pem with the following command for the Development Server too.

Log into the AWS console and create a “development-server.pem” key-pair for Development Server on the EC2 menu, or you can use the AWS CLI command below to create a “development-server.pem”;

aws ec2 create-key-pair --region us-east-1 --key-name development-server --query KeyMaterial --output text > ~/.ssh/development-server.pem
chmod 400 ~/.ssh/development-server.pem

Line 2 “ami”; you must enter “ami-026b57f3c383c2eec” (You can check it on ami list on the AWS )

Line 3 “region”; you must enter “us-east-1”. If you are working in a different region, you can change its values

Line 4 “instance_type”; you must enter “t3a.medium”. EC2 instance size will use, the minimum is t3a.medium but t3a.large or t3a.xlarge could be used if within budget. Springboot app microservices don’t work properly at the lower instance_type level.

Line 5 “ development_server_secgr”; you must enter “development-server-secgr”. You can give any name you want. But in manual installation, the name given here should be compatible with the security group in the “launch instance” menu, as shown in Figure 8.

Line 6 “development-server-tag”; you must enter “Development Server of Microservices”. This is the same as the previous item, in the manual installation it should be compatible with the tag that is given.

After the settings are finished, run the terraform initcommand in the folder where the terraform files are. To initiate the creation of the environment, run terraform apply --auto-approve, as shown in Figures 3–4.

Figure 3
Figure 4

Then go into your AWS account EC2>Instance, you must see Development Server, as shown in Figure 5.

Figure 5

3. Launching Development environment

3. a. Creating and cloning Source Code Management Repository(GitHub) and working in different branches on Development Server

Connect to your Development Server via “ssh”, as shown in Figure 6.

Figure 6

Clone the petclinic app from the repository [a Java app that consists of 10 Microservice, named Spring Petclinic Microservices App] (3). Don’t forget to add your GitHub token to the command below. This way, we won’t have to enter the password on every push command, as shown in Figures 7–8.

https://<your-github-token>@github.com/cmakkaya/microservices-with-db-on-dev-server.git
Figure 7
Figure 8

Create a “dev” branch, with “git branch dev” command. And switch to the “dev” branch, with “git checkout dev” command, as shown in Figure 9. (1)

In this way, when an error occurs, we can recover the project by reverting to a working branch. This is the purpose and biggest benefit of using git anyway.

Figure 9

In order to don’t get a “permission denied” error, give execution permission to **mvnw**, as shown in Figure 10.

Figure 10

Now, I will connect to the Development server with Vscode to work more easily, as shown in Figure 11. For more information on how it’s done (step-by-step explanation) check my article. If you haven’t used it before, you will love it.

Figure 11

3. b. Building Source Code using Maven

Test the compiled source code, using the command below, as shown in Figure 12.

Note: The commands need to be executed inside the project folder. Go to the project folder using the “cd <your_project_folder>” command.

./mvnw clean test
Figure 12

Note: If you get an error while running the “mvnw” command, try to execute it using the command below in the project folder.

chmod +x mvnw

For more information about Maven and Maven Build Lifecycle, you can read my article.

Unit tests of the application were carried out successfully with this command. Also, the “.m2” directory is created in the “/home/ec2-user/.m2” directory, after running the first mvn command. Files (dependencies, plug-in etc.) downloaded from the internet are stored in this folder, as shown in Figures 13–14

Figure 13
Figure 14

Install distributable “JAR”s into the local repository (in .m2 folder). Convert the compiled source code to .Jar (It is an artifact file.). For this, run the command below, as shown in Figure 15.

./mvnw clean install
Figure 15

Jar files of microservices apps were created into .m2 folder and target folder, after the “./mvnw clean install” command ran, as shown in Figures 16–17.

Figure 16
Figure 17

4. Preparing Dockerfiles for Microservices

Prepare a Dockerfile for the “admin-server” microservice with the following content and save it under “spring-petclinic-admin-server”, as shown in Figure 18. For more information about Dokerfile, you can check this link or read my article.

FROM openjdk:11-jre
ARG DOCKERIZE_VERSION=v0.6.1
ARG EXPOSED_PORT=9090
ENV SPRING_PROFILES_ACTIVE docker,mysql
ADD https://github.com/jwilder/dockerize/releases/download/${DOCKERIZE_VERSION}/dockerize-alpine-linux-amd64-${DOCKERIZE_VERSION}.tar.gz dockerize.tar.gz
RUN tar -xzf dockerize.tar.gz
RUN chmod +x dockerize
ADD ./target/*.jar /app.jar
EXPOSE ${EXPOSED_PORT}
ENTRYPOINT ["java", "-Djava.security.egd=file:/dev/./urandom","-jar","/app.jar"]
Figure 18

Within other Microservices, create Docker files with the following content below.

* Prepare a Dockerfile for the `api-gateway` microservice with the following content and save it under `spring-petclinic-api-gateway`.

FROM openjdk:11-jre
ARG DOCKERIZE_VERSION=v0.6.1
ARG EXPOSED_PORT=8080
ENV SPRING_PROFILES_ACTIVE docker,mysql
ADD https://github.com/jwilder/dockerize/releases/download/${DOCKERIZE_VERSION}/dockerize-alpine-linux-amd64-${DOCKERIZE_VERSION}.tar.gz dockerize.tar.gz
RUN tar -xzf dockerize.tar.gz
RUN chmod +x dockerize
ADD ./target/*.jar /app.jar
EXPOSE ${EXPOSED_PORT}
ENTRYPOINT ["java", "-Djava.security.egd=file:/dev/./urandom","-jar","/app.jar"]

* Prepare a Dockerfile for the `config-server` microservice with the following content and save it under `spring-petclinic-config-server`.

FROM openjdk:11-jre
ARG DOCKERIZE_VERSION=v0.6.1
ARG EXPOSED_PORT=8888
ENV SPRING_PROFILES_ACTIVE docker,mysql
ADD https://github.com/jwilder/dockerize/releases/download/${DOCKERIZE_VERSION}/dockerize-alpine-linux-amd64-${DOCKERIZE_VERSION}.tar.gz dockerize.tar.gz
RUN tar -xzf dockerize.tar.gz
RUN chmod +x dockerize
ADD ./target/*.jar /app.jar
EXPOSE ${EXPOSED_PORT}
ENTRYPOINT ["java", "-Djava.security.egd=file:/dev/./urandom","-jar","/app.jar"]

* Prepare a Dockerfile for the `customer-service` microservice with the following content and save it under `spring-petclinic-customer-service`.

FROM openjdk:11-jre
ARG DOCKERIZE_VERSION=v0.6.1
ARG EXPOSED_PORT=8081
ENV SPRING_PROFILES_ACTIVE docker,mysql
ADD https://github.com/jwilder/dockerize/releases/download/${DOCKERIZE_VERSION}/dockerize-alpine-linux-amd64-${DOCKERIZE_VERSION}.tar.gz dockerize.tar.gz
RUN tar -xzf dockerize.tar.gz
RUN chmod +x dockerize
ADD ./target/*.jar /app.jar
EXPOSE ${EXPOSED_PORT}
ENTRYPOINT ["java", "-Djava.security.egd=file:/dev/./urandom","-jar","/app.jar"]

* Prepare a Dockerfile for the `discovery-server` microservice with the following content and save it under `spring-petclinic-discovery-server`.

FROM openjdk:11-jre
ARG DOCKERIZE_VERSION=v0.6.1
ARG EXPOSED_PORT=8761
ENV SPRING_PROFILES_ACTIVE docker,mysql
ADD https://github.com/jwilder/dockerize/releases/download/${DOCKERIZE_VERSION}/dockerize-alpine-linux-amd64-${DOCKERIZE_VERSION}.tar.gz dockerize.tar.gz
RUN tar -xzf dockerize.tar.gz
RUN chmod +x dockerize
ADD ./target/*.jar /app.jar
EXPOSE ${EXPOSED_PORT}
ENTRYPOINT ["java", "-Djava.security.egd=file:/dev/./urandom","-jar","/app.jar"]

* Prepare a Dockerfile for the `hystrix-dashboard` microservice with the following content and save it under `spring-petclinic-hystrix-dashboard`.

FROM openjdk:11-jre
ARG DOCKERIZE_VERSION=v0.6.1
ARG EXPOSED_PORT=7979
ENV SPRING_PROFILES_ACTIVE docker,mysql
ADD https://github.com/jwilder/dockerize/releases/download/${DOCKERIZE_VERSION}/dockerize-alpine-linux-amd64-${DOCKERIZE_VERSION}.tar.gz dockerize.tar.gz
RUN tar -xzf dockerize.tar.gz
RUN chmod +x dockerize
ADD ./target/*.jar /app.jar
EXPOSE ${EXPOSED_PORT}
ENTRYPOINT ["java", "-Djava.security.egd=file:/dev/./urandom","-jar","/app.jar"]

* Prepare a Dockerfile for the `vets-service` microservice with the following content and save it under `spring-petclinic-vets-service`.

FROM openjdk:11-jre
ARG DOCKERIZE_VERSION=v0.6.1
ARG EXPOSED_PORT=8083
ENV SPRING_PROFILES_ACTIVE docker,mysql
ADD https://github.com/jwilder/dockerize/releases/download/${DOCKERIZE_VERSION}/dockerize-alpine-linux-amd64-${DOCKERIZE_VERSION}.tar.gz dockerize.tar.gz
RUN tar -xzf dockerize.tar.gz
RUN chmod +x dockerize
ADD ./target/*.jar /app.jar
EXPOSE ${EXPOSED_PORT}
ENTRYPOINT ["java", "-Djava.security.egd=file:/dev/./urandom","-jar","/app.jar"]

* Prepare a Dockerfile for the `visits-service` microservice with the following content and save it under `spring-petclinic-visits-service`.

FROM openjdk:11-jre
ARG DOCKERIZE_VERSION=v0.6.1
ARG EXPOSED_PORT=8082
ENV SPRING_PROFILES_ACTIVE docker,mysql
ADD https://github.com/jwilder/dockerize/releases/download/${DOCKERIZE_VERSION}/dockerize-alpine-linux-amd64-${DOCKERIZE_VERSION}.tar.gz dockerize.tar.gz
RUN tar -xzf dockerize.tar.gz
RUN chmod +x dockerize
ADD ./target/*.jar /app.jar
EXPOSE ${EXPOSED_PORT}
ENTRYPOINT ["java", "-Djava.security.egd=file:/dev/./urandom","-jar","/app.jar"]

5. Preparing Script for Building Docker Images

Prepare a script to build the docker images and save it as “build-dev-docker-images.sh” under the “petclinic-microservices-with-db” folder, as shown in Figure 12.

./mvnw clean package
docker build --force-rm -t "petclinic-admin-server:dev" ./spring-petclinic-admin-server
docker build --force-rm -t "petclinic-api-gateway:dev" ./spring-petclinic-api-gateway
docker build --force-rm -t "petclinic-config-server:dev" ./spring-petclinic-config-server
docker build --force-rm -t "petclinic-customers-service:dev" ./spring-petclinic-customers-service
docker build --force-rm -t "petclinic-discovery-server:dev" ./spring-petclinic-discovery-server
docker build --force-rm -t "petclinic-hystrix-dashboard:dev" ./spring-petclinic-hystrix-dashboard
docker build --force-rm -t "petclinic-vets-service:dev" ./spring-petclinic-vets-service
docker build --force-rm -t "petclinic-visits-service:dev" ./spring-petclinic-visits-service
docker build --force-rm -t "petclinic-grafana-server:dev" ./docker/grafana
docker build --force-rm -t "petclinic-prometheus-server:dev" ./docker/prometheus

Give execution permission to “build-dev-docker-images.sh” using the command below, as shown in Figure 19.

chmod +x build-dev-docker-images.sh
Figure 19

And, build the images, as shown in Figures 20–21.

./build-dev-docker-images.sh
Figure 20
Figure 21

6. Preparing Docker Compose File

Compose is a tool for defining and running multi-container Docker applications. With Compose, you use a YAML file to configure your application’s services. Then, with a single command, you create and start all the services from your configuration. (4) It’s great convenience to deploy the app into the docker container.

Prepare a docker compose file to deploy the application locally and save it as “docker-compose-local.yml” under the “petclinic-microservices-with-db” folder, as shown in Figure 22. For more information about Doker Compose, you can check this link.

version: '2'

services:
config-server:
image: petclinic-config-server:dev
container_name: config-server
mem_limit: 512M
ports:
- 8888:8888

discovery-server:
image: petclinic-discovery-server:dev
container_name: discovery-server
mem_limit: 512M
ports:
- 8761:8761
depends_on:
- config-server
entrypoint: ["./dockerize", "-wait=tcp://config-server:8888", "-timeout=160s", "--", "java", "-Djava.security.egd=file:/dev/./urandom","-jar","/app.jar"]

customers-service:
image: petclinic-customers-service:dev
container_name: customers-service
mem_limit: 512M
ports:
- 8081:8081
depends_on:
- config-server
- discovery-server
entrypoint: ["./dockerize", "-wait=tcp://discovery-server:8761", "-timeout=160s", "--", "java", "-Djava.security.egd=file:/dev/./urandom","-jar","/app.jar" ]

visits-service:
image: petclinic-visits-service:dev
container_name: visits-service
mem_limit: 512M
ports:
- 8082:8082
depends_on:
- config-server
- discovery-server
entrypoint: ["./dockerize", "-wait=tcp://discovery-server:8761", "-timeout=160s", "--", "java", "-Djava.security.egd=file:/dev/./urandom","-jar","/app.jar" ]

vets-service:
image: petclinic-vets-service:dev
container_name: vets-service
mem_limit: 512M
ports:
- 8083:8083
depends_on:
- config-server
- discovery-server
entrypoint: ["./dockerize", "-wait=tcp://discovery-server:8761", "-timeout=160s", "--", "java", "-Djava.security.egd=file:/dev/./urandom","-jar","/app.jar" ]

api-gateway:
image: petclinic-api-gateway:dev
container_name: api-gateway
mem_limit: 512M
ports:
- 8080:8080
depends_on:
- config-server
- discovery-server
entrypoint: ["./dockerize", "-wait=tcp://discovery-server:8761", "-timeout=160s", "--", "java", "-Djava.security.egd=file:/dev/./urandom","-jar","/app.jar" ]

admin-server:
image: petclinic-admin-server:dev
container_name: admin-server
mem_limit: 512M
ports:
- 9090:9090
depends_on:
- config-server
- discovery-server
entrypoint: ["./dockerize", "-wait=tcp://discovery-server:8761", "-timeout=160s", "--", "java", "-Djava.security.egd=file:/dev/./urandom","-jar","/app.jar" ]

hystrix-dashboard:
image: petclinic-hystrix-dashboard:dev
container_name: hystrix-dashboard
mem_limit: 512M
ports:
- 7979:7979
depends_on:
- config-server
- discovery-server
entrypoint: ["./dockerize", "-wait=tcp://discovery-server:8761", "-timeout=160s", "--", "java", "-Djava.security.egd=file:/dev/./urandom","-jar","/app.jar" ]

tracing-server:
image: openzipkin/zipkin
container_name: tracing-server
mem_limit: 512M
environment:
- JAVA_OPTS=-XX:+UnlockExperimentalVMOptions -Djava.security.egd=file:/dev/./urandom
ports:
- 9411:9411

grafana-server:
image: petclinic-grafana-server:dev
container_name: grafana-server
mem_limit: 256M
ports:
- 3000:3000

prometheus-server:
image: petclinic-prometheus-server:dev
container_name: prometheus-server
mem_limit: 256M
ports:
- 9091:9090

mysql-server:
image: mysql:5.7.8
container_name: mysql-server
environment:
MYSQL_ROOT_PASSWORD: petclinic
MYSQL_DATABASE: petclinic
mem_limit: 256M
ports:
- 3306:3306
Figure 22

In order to test the deployment of the app locally with “docker-compose-local.yml”, run the command below, as shown in Figure 23.

docker-compose -f docker-compose-local.yml up
Figure 23

We did not run Docker compose in detach mode because we want to observe the Microservices installed in the terminal. Thus, if there is an error, we will detect it. Observe terminal output, microservices started to be installed.

7. Observing what happens in the containers after the “docker-compose” command runs?

In order to check docker images that created by “docker-compose-local.yml”, run the command below, as shown in Figure 24.

docker images
Figure 24

Go to your browser and enter “your development server IP:8080”. Api gateway’s port was “8080”. We should see the Springboot Vet page, as shown in Figure 25.

Figure 25

Enter values into the browser to check if the database is working properly, as shown in Figures 26–27–28.

Figure 26
Figure 27
Figure 28

When we finished working with microservices, press Ctrl+C to stop Docker compose, as shown in Figure 29.

Figure 29

After the ctrl+c command, it will stop working in microservices and the Springboot Vet page will not appear in the browser.

The video of what happens after the “docker-compose” command runs is shown in Video-1.

Video-1

8. Pushing created files to the remote repo (GitHub)

Commit the change, then push created files (the dockerfile, the docker-compose file, target folder, etc) to the remote repo (GitHub). Then, checkout to the “main” branch. Run the command below, as shown in Figure 30.

The best practice is to create a different branch and continue from the new branch in the next stage.

git add .
git commit -m 'added docker file and docker-compose file for local deployment'
git push --set-upstream origin dev
git checkout main
Figure 30

9. As a result

We created a development server. So, developers can simply create, develop the code and test it directly to an application on the container. And they can see the test result instantly.

If you liked the article, I would be happy if you click on the Medium Following button to encourage me to write and not miss future articles.

Your clap, follow or subscribe, they help my articles to reach the broader audience. Thank you in advance for them.

For more info and questions, please contact me on Linkedin or Medium.

1O. Next post

We will create production environments, and run our Springboot microservices application in it. The app will be made available to users on the Internet. We will use Rancher to create and manage our Kubernetes clusters. We will create the cluster on AWS EKS by using Rancher’s menus. We will use AWS RDS MySql Database for customer records. We will set Domain Name, Create an “A record” for the microservices app in our hosted zone by using AWS Route 53 domain registrar and bind it to our “ app cluster”. We will configure TLS(SSL) certificate for HTTPS connection to the domain name using AWS Certification Manager. Finally, we will check whether our microservices application works in the browser, and monitor the microservices apps in the cluster with Prometheus and Grafana. We will do them all step by step.

I hope you enjoyed reading this article. Don’t forget to follow my Medium or LinkedIn account to be informed about new articles. I wish you growing success in the DevOps and the Cloud way.

Happy Clouding…

--

--

Cumhur Akkaya

✦ DevOps/Cloud Engineer, ✦ Believes in learning by doing, ✦ Dedication To Lifelong Learning, ✦ Tea and Coffee Drinker. ✦ Linkedin: linkedin.com/in/cumhurakkaya